Pneu Service Dz – Vente En Ligne Des Pneus
Pneu Service Dz – Vente En Ligne Des Pneus

https://pneuservice.dz
Development : Naro Dev
Garphics : Graphéin


Pneu Service Dz – Vente En Ligne Des Pneus
Development : Naro Dev
Garphics : Graphéin

A Narodev Creation :
– Amine G –
– Ilyes A –
– Mohammed .N.B –


Saiko Sushi – Japaneese Food .
You can use emoji (and other graphical unicode characters) in URLs. And wow is it great. But no one seems to do it. Why? Perhaps emoji are too exotic for normie web platforms to handle? Or maybe they are avoided for fear of angering the SEO gods?
Whatever the reason, the overlapping portion on the Venn diagram of “It’s Possible v.s. No One Is Doing It” is where my excitement usually lies. Graphically animating URLs is a new thing. So I decided to put a little time into the possibilities of graphical characters in URLs. Specifically, with the possibility for animating these characters by way of some Javascript.
First off, make sure your page’s Javascript code is being labelled as UTF-8 or you’re gonna have a bad time putting emoji in your code at all. This can be accomplished via an HTTP header, or page META tag. There’s a good chance you don’t have to worry about this. But you can find more info about this here: Unicode in Javascript by Flavio
To achieve our desired outcome of emoji dancing like sugar plum fairies in our address bar, we need a loop. And really, all we need is a loop. We start the loop, it loops, and we’re happy. So here’s our first loop, a spinning emoji moon. I think when they added this sequence of emoji they must have had this in mind right?

var f = ['?', '?', '?', '?', '?', '?', '?', '?'];

    function loop() {
        location.hash = f[Math.floor((Date.now()/100)%f.length)];

        setTimeout(loop, 50);
    }

    loop();
Run Moon Code:
You can click the toggle checkbox above to see the result of this loop in your URL bar.
If you don’t like the spinning moons you can swap out that array with whatever emojis you want. Like a clock:

var f = ['?','?','?','?','?','?','?','?','?','?','?','?'];
Run Clock Code:
This is a real simple example. Too simple really. So let’s upgrade our loop so that it generates a string of multiple emoji! This time we’re utilizing the emoji “skin tone modifiers” characters to make some color-changing babies:

var e = ['?', '?', '?', '?', '?'];

    function loop() {
        var s = '',
            i, m;

        for (i = 0; i < 10; i ++) {
            m = Math.floor(e.length * ((Math.sin((Date.now()/100) + i)+1)/2));
            s += '?' + e[m];
        }

        location.hash = s;

        setTimeout(loop, 50);
    }

    loop();
Run Babies Code:
We use a sine wave controlled by time and position to select which color we want. This gives us a nice loopy color changing effect!
Or how about we revisit our moon spinner, spread it out, and make something resembling a loading indicator? Sure, let’s do it:

var f = ['?', '?', '?', '?', '?', '?', '?', '?'],
        d = [0, 0, 0, 0, 0, 0, 0, 0, 0, 0],
        m = 0;

    function loop() {
        var s = '', x = 0;

        if (!m) {
            while (d[x] == 4) {
                x ++;
            }

            if (x >= d.length) m = 1;
            else {
                d[x] ++;
            }
        }
        else {
            while (d[x] == 0) {
                x ++;
            }

            if (x >= d.length) m = 0;
            else {
                d[x] ++;

                if (d[x] == 8) d[x] = 0;
            }
        }

        d.forEach(function (n) {
            s += f[n];
        });

        location.hash = s;

        setTimeout(loop, 50);
    }

    loop();
Run Multi-Moon Code:
But it’s not just emoji that give us a means to pump graphics out of our URL bar. There’s a whole boatload of unicode characters of interest to our goals.
Particularly interesting are the Box-drawing Characters:
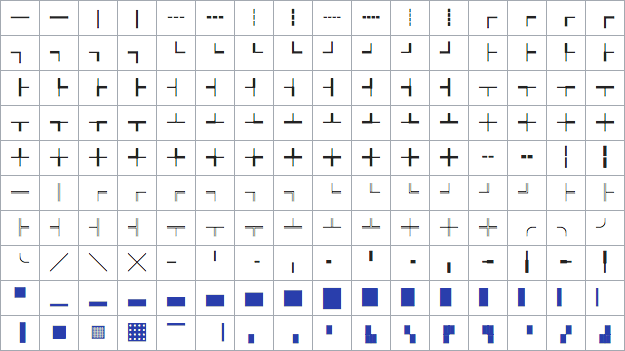
Many of these lend themselves better to a two dimensional output. But they’re still pretty good on the single line we have to play with. For instance we can make a string of multiple height varied block characters and construct a nice little wave:

function loop() {
        var i, n, s = '';

        for (i = 0; i < 10; i++) {
            n = Math.floor(Math.sin((Date.now()/200) + (i/2)) * 4) + 4;

            s += String.fromCharCode(0x2581 + n);
        }

        window.location.hash = s;

        setTimeout(loop, 50);
    }

    loop();
Run Wavy Code:
I liked this look so much I put it up permanently at wavyurl.com.
Using the variable width characters we can even wiggle on the horizontal, creating something like a progress bar:

function loop() {
        var s = '',
            p;

        p = Math.floor(((Math.sin(Date.now()/300)+1)/2) * 100);

        while (p >= 8) {
            s += '█';
            p -= 8;
        }
        s += ['⠀','▏','▎','▍','▌','▋','▊','▉'][p];

        location.hash = s;
        setTimeout(loop, 50);
    }
Run Progress Bar Code:
A progress bar huh? That’s like, almost useful. Which brings me to…
In an attempt to reduce the frivolity in our little experiment, I came up with the idea to show a web video’s progress in the URL. I simply attach a function that renders our progress string to the “timeupdate” event for a video, and voila! A video progress indicator in the URL, complete with the time and duration!

var video;

    function formatTime(seconds) {
        var minutes = Math.floor(seconds/60),
            seconds = Math.floor(seconds - (minutes*60));

        return ('0'+minutes).substr(-2) + ':' + ('0'+seconds).substr(-2);
    }

    function renderProgressBar() {
        var s = '',
            l = 15,
            p = Math.floor(video.currentTime / video.duration * (l-1)),
            i;

        for (i = 0; i < l; i ++) {
            if (i == p) s +='◯';
            else if (i < p) s += '─';
            else s += '┄';
        }

        location.hash = '╭'+s+'╮'+formatTime(video.currentTime)+'╱'+formatTime(video.duration);
    }

    video = document.getElementById('video');
    video.addEventListener('timeupdate', renderProgressBar);
Run Video Progress Bar Code:
With the above checkbox checked, you can use the video below to try it out.
I rather like this lines and circle progress bar, but if you fancy some moon emoji, I’ve got you covered:

var e = ['?', '?', '?', '?', '?'],
        video;

    function formatTime(seconds) {
        var minutes = Math.floor(seconds/60),
            seconds = Math.floor(seconds - (minutes*60));

        return ('0'+minutes).substr(-2) + ':' + ('0'+seconds).substr(-2);
    }

    function renderProgressBar() {
        var s = '',
            c = 0,
            l = 10,
            p = Math.floor(video.currentTime / video.duration * ((l*5)-1)),
            i;

        while (p >= 5) {
            s += e[4];
            c ++;
            p -= 5;
        }
        s += e[p];
        c ++;

        while (c < l) {
            s += e[0];
            c ++;
        }

        location.hash = s+formatTime(video.currentTime)+'╱'+formatTime(video.duration);
    }

    video = document.getElementById('video');
    video.addEventListener('timeupdate', renderProgressBar);
Run Video Moons Progress Bar Code:
Okay, calling this progress bar “useful” is a stretch. But if I squint, I can almost see a scenario where it would be useful to have this in a video sharing URL. Like YouTube has the option of creating a link to a video at a specific time. Might it not be cool to include a visual indication? Hmmm?
Maybe there is some more useful implementation of this “technology” that I haven’t come up with. I’ll keep thinking on that. And hey, maybe you can come up with something?
You may be wondering why I used “location.hash =” instead of the newer and shinier HTML5 History API. Two reasons. One solvable. The other less so. Both inconvenient.
Issue 1 is also a feature of the History API: It actually changes the whole URL path, not just the hash. So if I use the History API and change our page to “/?????”, it’ll look nicer than having tacked on a #. But it also means my web server must be able to response to “/?????”, or the user will be out of luck if they refresh, or otherwise navigate to the modified URL. This is doable, but trickier than using “location.hash =” which doesn’t require me to prepare the server in any special way.
Issue 2 is more unexpected. Turns out that in 2 out of 3 browsers I tested, the History API is throttled. If I push my wavy URL characters to the address bar at a fast rate I’ll eventually get the following error in Chrome:
Throttling history state changes to prevent the browser from hanging.
Safari is nice enough to give us a bit more info:
SecurityError: Attempt to use history.pushState() more than 100 times per 30.000000 seconds
Now if I stay under that limit I’m fine. But c’mon, 3 frames a second just doesn’t cut it for the ooey gooey URL animations I desire.
Good boy Firefox on the other hand doesn’t seem to give a hoot how many times I push a new history or how quickly. Which is gosh darn thoughtful of it. But breaking in two major browsers, plus neccesitating the web server configuration to fix Issue 1, makes me willing to put up with a little # in the URL.
I’ll leave it there. But I will tell ya that I’ve got a few ideas for making tiny games that display in the URL bar. Especially given the Braille Characters that we have yet to explore. So stay tuned for that.
If you have questions, comments, or simply want to keep up with my latest tinkerings, check me out on Twitter: @MatthewRayfield. Or subscribe to my almost-never-bothered email list here.
Oh and if you want the source for these URL mutilating abominations wrapped up in nice little ready-to-run HTML files, here you go ;]
Bye for now!

Ever since the first animated DHTML cursor trails and “Site of the Week” badges graced the web, re-usable code has been a temptation for web developers. And ever since those heady days, integrating third-party UI into your site has been, well, a semi-brittle headache.
Using other people’s clever code has required buckets of boilerplate JavaScript or CSS conflicts involving the dreaded !important. Things are a bit better in the world of React and other modern frameworks, but it’s a bit of a tall order to require the overhead of a full framework just to re-use a widget. HTML5 introduced a few new elements like <video> and <input type="date">, which added some much-needed common UI widgets to the web platform. But adding new standard elements for every sufficiently common web UI pattern isn’t a sustainable option.
In response, a handful of web standards were drafted. Each standard has some independent utility, but when used together, they enable something that was previously impossible to do natively, and tremendously difficult to fake: the capability to create user-defined HTML elements that can go in all the same places as traditional HTML. These elements can even hide their inner complexity from the site where they are used, much like a rich form control or video player.
As a group, the standards are known as Web Components. In the year 2018 it’s easy to think of Web Components as old news. Indeed, early versions of the standards have been around in one form or another in Chrome since 2014, and polyfills have been clumsily filling the gaps in other browsers.
After some quality time in the standards committees, the Web Components standards were refined from their early form, now called version 0, to a more mature version 1 that is seeing implementation across all the major browsers. Firefox 63 added support for two of the tent pole standards, Custom Elements and Shadow DOM, so I figured it’s time to take a closer look at how you can play HTML inventor!
Given that Web Components have been around for a while, there are lots of other resources available. This article is meant as a primer, introducing a range of new capabilities and resources. If you’d like to go deeper (and you definitely should), you’d do well to read more about Web Components on MDN Web Docs and the Google Developers site.
Defining your own working HTML elements requires new powers the browser didn’t previously give developers. I’ll be calling out these previously-impossible bits in each section, as well as what other newer web technologies they draw upon.
<template> element: a refresherThis first element isn’t quite as new as the others, as the need it addresses predates the Web Components effort. Sometimes you just need to store some HTML. Maybe it’s some markup you’ll need to duplicate multiple times, maybe it’s some UI you don’t need to create quite yet. The <template> element takes HTML and parses it without adding the parsed DOM to the current document.
<template>
  <h1>This won't display!</h1>
  <script>alert("this won't alert!");</script>
</template>
Where does that parsed HTML go, if not to the document? It’s added to a “document fragment”, which is best understood as a thin wrapper that contains a portion of an HTML document. Document fragments dissolve when appended to other DOM, so they’re useful for holding a bunch of elements you want later, in a container you don’t need to keep.
“Well okay, now I have some DOM in a dissolving container, how do I use it when I need it?”
You could simply insert the template’s document fragment into the current document:
let template = document.querySelector('template');
document.body.appendChild(template.content);
This works just fine, except you just dissolved the document fragment! If you run the above code twice you’ll get an error, as the second time template.content is gone. Instead, we want to make a copy of the fragment prior to inserting it:
document.body.appendChild(template.content.cloneNode(true));
The cloneNode method does what it sounds like, and it takes an argument specifying whether to copy just the node itself or include all its children.
The template tag is ideal for any situation where you need to repeat an HTML structure. It particularly comes in handy when defining the inner structure of a component, and thus <template> is inducted into the Web Components club.
cloneNodeCustom Elements is the poster child for the Web Components standards. It does what it says on the tin – allowing developers to define their own custom HTML elements. Making this possible and pleasant builds fairly heavily on top of ES6’s class syntax, where the v0 syntax was much more cumbersome. If you’re familiar with classes in JavaScript or other languages, you can define classes that inherit from or “extend” other classes:
class MyClass extends BaseClass {
// class definition goes here
}
Well, what if we were to try this?
class MyElement extends HTMLElement {}
Until recently that would have been an error. Browsers didn’t allow the built-in HTMLElement class or its subclasses to be extended. Custom Elements unlocks this restriction.
The browser knows that a <p> tag maps to the HTMLParagraphElement class, but how does it know what tag to map to a custom element class? In addition to extending built-in classes, there’s now a “Custom Element Registry” for declaring this mapping:
customElements.define('my-element', MyElement);
Now every <my-element> on the page is associated with a new instance of MyElement. The constructor for MyElement will be run whenever the browser parses a <my-element> tag.
What’s with that dash in the tag name? Well, the standards bodies want the freedom to create new HTML tags in the future, and that means that developers can’t just go creating an <h7> or <vr> tag. To avoid future conflicts, all custom elements must contain a dash, and standards bodies promise to never make a new HTML tag containing a dash. Collision avoided!
In addition to having your constructor called whenever your custom element is created, there are a number of additional “lifecycle” methods that are called on a custom element at various moments:
connectedCallback is called when an element is appended to a document. This can happen more than once, e.g. if the element is moved or removed and re-added.disconnectedCallback is the counterpart to connectedCallback.attributeChangeCallback fires when attributes from a whitelist are modified on the element.A slightly richer example looks like this:
class GreetingElement extends HTMLElement {
  constructor() {
    super();
    this._name = 'Stranger';
  }
  connectedCallback() {
    this.addEventListener('click', e => alert(`Hello, ${this._name}!`));
  }
  attributeChangedCallback(attrName, oldValue, newValue) {
    if (attrName === 'name') {
      if (newValue) {
        this._name = newValue;
      } else {
        this._name = 'Stranger';
      }
    }
  }
}
GreetingElement.observedAttributes = ['name'];
customElements.define('hey-there', GreetingElement);
Using this on a page will look like the following:
<hey-there>Greeting</hey-there>
<hey-there name="Potch">Personalized Greeting</hey-there>
But what if you want to extend an existing HTML element? You definitely can and should, but using them within markup looks fairly different. Let’s say we want our greeting to be a button:
class GreetingElement extends HTMLButtonElement
We’ll also need to tell the registry we’re extending an existing tag:
customElements.define('hey-there', GreetingElement, { extends: 'button' });
Because we’re extending an existing tag, we actually use the existing tag instead of our custom tag name. We use the new special is attribute to tell the browser what kind of button we’re using:
<button is="hey-there" name="World">Howdy</button>
It may seem a bit clunky at first, but assistive technologies and other scripts wouldn’t know our custom element is a kind of button without this special markup.
From here, all the classic web widget techniques apply. We can set up a bunch of event handlers, add custom styling, and even stamp out an inner structure using <template>. People can use your custom element alongside their own code, via HTML templating, DOM calls, or even new-fangled frameworks, several of which support custom tag names in their virtual DOM implementations. Because the interface is the standard DOM interface, Custom Elements allows for truly portable widgets.
customElements.define()extends keywordWe’ve made our friendly custom element, we’ve even thrown on some snazzy styling. We want to use it on all our sites, and share the code with others so they can use it on theirs. How do we prevent the nightmare of conflicts when our customized <button> element runs face-first into the CSS of other sites? Shadow DOM provides a solution.
The Shadow DOM standard introduces the concept of a shadow root. Superficially, a shadow root has standard DOM methods, and can be appended to as if it was any other DOM node. Shadow roots shine in that their contents don’t appear to the document that contains their parent node:
// attachShadow creates a shadow root.
let shadow = div.attachShadow({ mode: 'open' });
let inner = document.createElement('b');
inner.appendChild(document.createTextNode('Hiding in the shadows'));
// shadow root supports the normal appendChild method.
shadow.appendChild(inner);
div.querySelector('b'); // empty
In the above example, the <div> “contains” the <b> and the <b> is rendered to the page, but the traditional DOM methods can’t see it. Not only that, but the styles of the containing page can’t see it either. This means that styles outside of a shadow root can’t get in, and styles inside the shadow root don’t leak out. This boundary is not meant to be a security feature, as another script on the page could detect the shadow root’s creation, and if you have a reference to a shadow root, you can query it directly for its contents.
The contents of a shadow root are styled by adding a <style> (or <link>) to the root:
let style = document.createElement('style');
style.innerText = 'b { font-weight: bolder; color: red; }';
shadowRoot.appendChild(style);
let inner = document.createElement('b');
inner.innerHTML = "I'm bolder in the shadows";
shadowRoot.appendChild(inner);
Whew, we could really use a <template> right about now! Either way, the <b> will be affected by the stylesheet in the root, but any outer styles matching a <b> tag will not.
What if a custom element has non-shadow content? We can make them play nicely together using a new special element called <slot>:
<template>
  Hello, <slot></slot>!
</template>
If that template is attached to a shadow root, then the following markup:
<hey-there>World</hey-there>
Will render as:
Hello, World!
This ability to composite shadow roots with non-shadow content allows you to make rich custom elements with complex inner structures that look simple to the outer environment. Slots are more powerful than I’ve shown here, with multiple slots and named slots and special CSS pseudo-classes to target slotted content. You’ll have to read more!
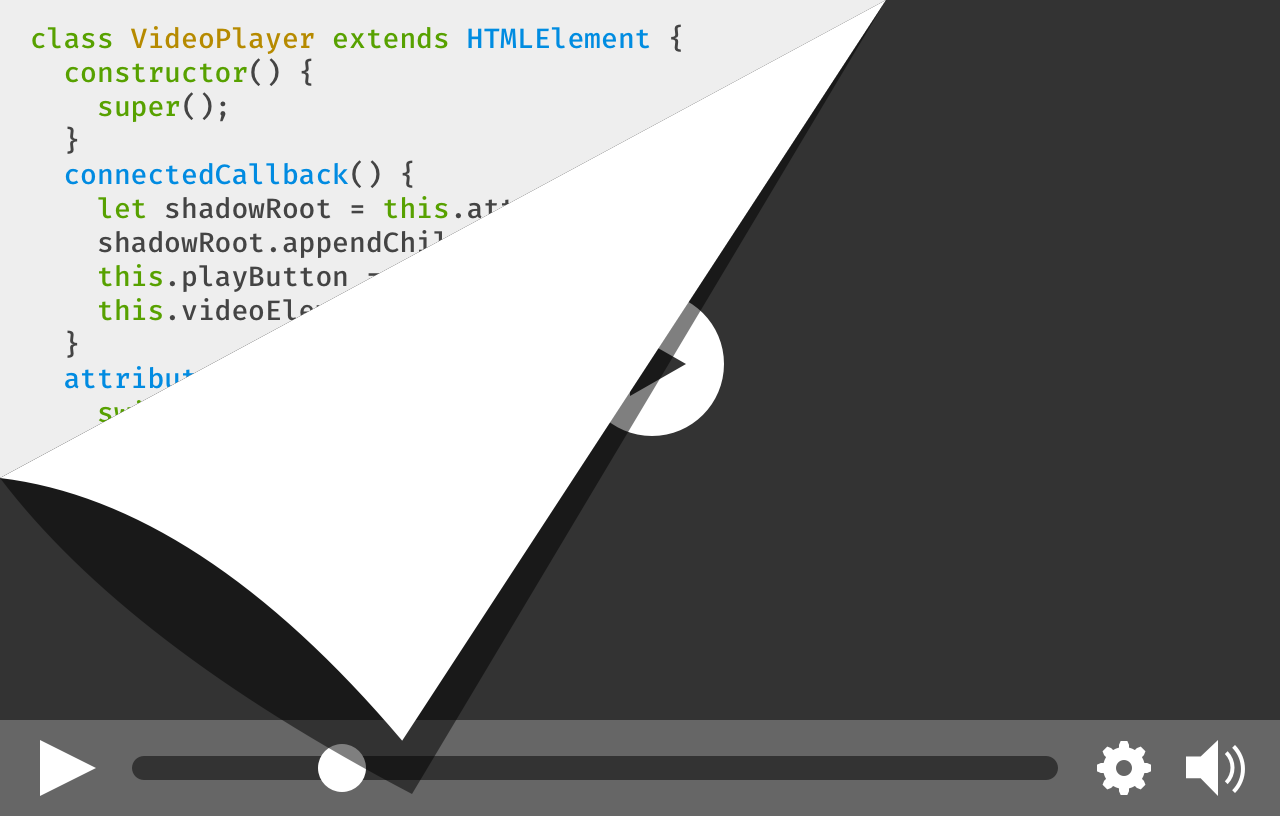
<slot> elementLet’s make a fancy button! We’ll be creative and call the element <fancy-button>. What makes it fancy? It will have a custom style, and it will also allow us to supply an icon and make that look snazzy as well. We’d like our button’s styles to stay fancy no matter what site you use them on, so we’re going to encapsulate the styles in a shadow root.
You can see the completed custom element in the interactive example below. Be sure to take a look at both the JS definition of the custom element and the HTML <template> for the style and structure of the element.
The standards that make up Web Components are built on the philosophy that by providing multiple low-level capabilities, people will combine them in ways that nobody expected at the time the specs were written. Custom Elements have already been used to make it easier to build VR content on the web, spawned multiple UI toolkits, and much more. Despite the long standardization process, the emerging promise of Web Components puts more power in the hand of creators. Now that the technology is available in browsers, the future of Web Components is in your hands. What will you build?